Note: make sure to read my first tip in this course on Alto Clef concerning Pitch Recognition, download the flashcard PDF files, and test yourself thoroughly before undertaking the drills in this tip.
Now that you’re completely familiar with the pitches defined by alto clef, it’s time to do some scoring – not using a notation application, but with pencil and paper. For this purpose, I’ve attached PDF files below of blank staff paper in A4 or US Letter, in case you don’t have any of your own lying around. If you want to splurge, then go ahead and buy some nice cream-laid staff paper from your local music store – nothing huge and towering on which to score out symphonies, but some common-sense sheets on which to develop some basic music writing (and therefore reading) skills. For best results, use a common-or-garden No. 2 pencil or lighter, and have an eraser handy because you may need it frequently. Once you have all the materials shown in the above banner assembled on your writing desk, then you’re ready for your first challenge: simply writing out the alto clef.
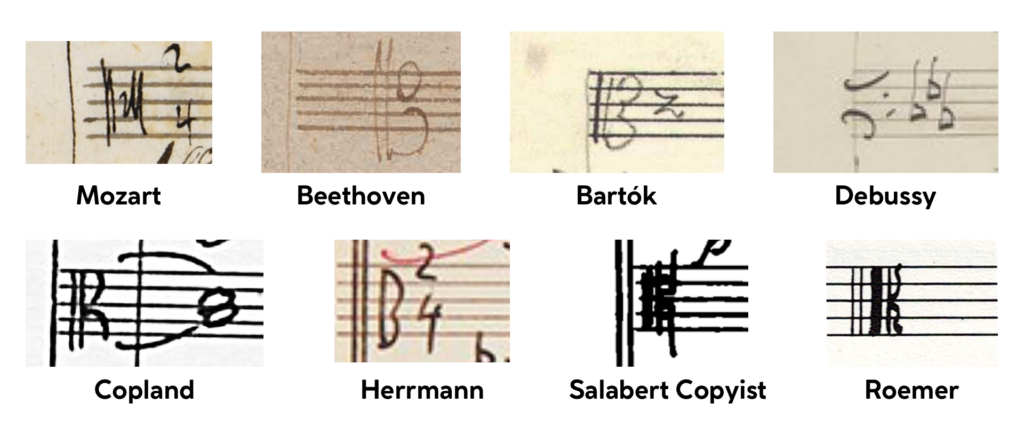
Before jumping into that, though, let’s take a look at how composers and copyists have written the clef. What we find is that each individual has their own unique trademark, developed over years of scoring by hand. In the examples below, we see that Mozart’s approach was a simple double line followed by a squiggle hooking around the centre line; whereas Beethoven’s double lines were followed by two mirrored curves, both arcing gracefully toward each other. Bartók’s alto clef looks a bit like Mickey Mouse ears rotated 90º to the right; while Debussy dispenses with the double line altogether and moves the curves to the very beginning of the staff, tucked away higher and lower to frame two dots in the middle two spaces. I love Aaron Copland’s simple sideways-seagull, and Bernard Herrmann’s simple B-shaped clef. Both indicate many hours spent scoring with extreme diligence yet rapidity. Finally, we have examples from two pro copyists at the top of their field. The copyist for Editions Salabert has a beautifully disciplined freehand clef, the exact shape of which may appear confusing. But a look at its neighbour as penned by the great Clinton Roemer (author of “The Art of Music Copying”) shows that it’s just a fancy way of writing a simple brace; such as one might use to bracket a grand staff, but of course much smaller.
But which shapes do I use, and recommend for the developing composer in their handwritten work? Either the 13 or the K. The 13 is in some ways the safest, and most easily recognisable should your score be passed around to copyists, conductors, and players. I used it for many years before gradually shifting over to the K as my output started to double and then quadruple. Then as more and more of my work was sketched and edited mentally, eventually to be scored directly to a notation app in a near-complete form, my handwriting dwindled in importance – but that doesn’t mean that a developing composer today can just skip ever sitting down to write alto clef parts. If you want to read in alto clef as easy as treble and bass, then you owe it to yourself to at least spend some time engraving new mental pathways by pencilling out a few exercises.
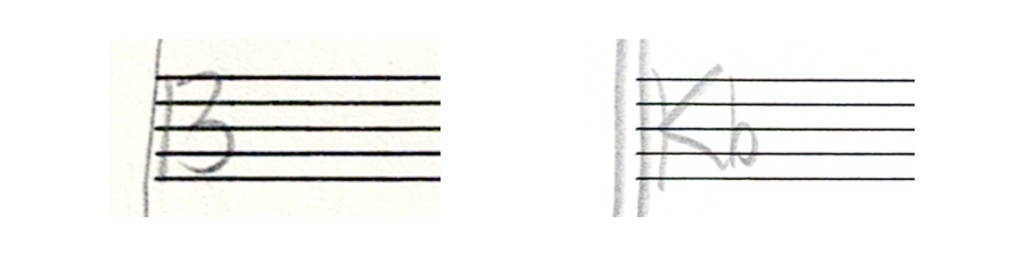
So our first drill is in some ways the most fun – developing your own handwritten style for alto clef. If you have a knack for creative calligraphy, you might develop something completely unique and personal. You have my whole-hearted support, so long as a.) it’s perfectly readable/identifiable as alto clef and b.) it’s easy and fast to write. Otherwise, stick with the 13 or the K at first.

Drill 1: Alto Clef Practice. Based on the above examples, write out a few dozen alto clefs until the motion is natural and instinctive to the hand. Functionality and legibility are much more important than engraver-quality perfection. This should at least fill a couple of blank staves on a sheet of staff paper.
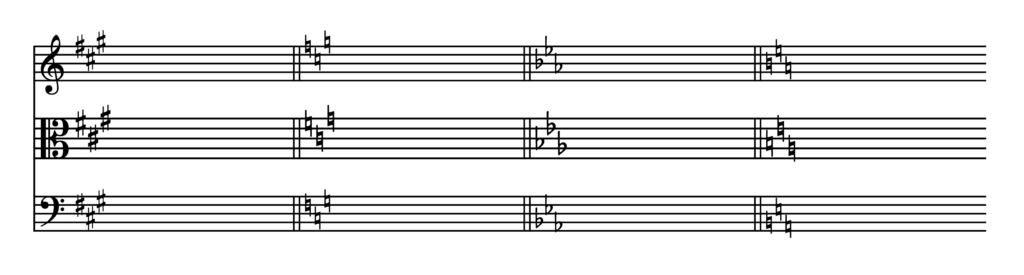
There’s another important aspect of alto clef scoring that’s too easily overlooked at the outset: the question of key signature placement. It’s better to add this to your toolkit beforedoing any significant scoring of notes. Luckily for us, this is only mildly confusing (compared to the relative jumbling of tenor clef key signature organisation). Alto clef key signatures are always one step lower than treble clef signatures, or one step higher than bass clef key sigs. Notice in the example below that first sharp sign of the A major key signature sits on the top space of staff; rather than the top line of the treble staff above, or the next-to-highest line of the bass staff below. Likewise, the first flat sign of the E-flat key signature two bars later sits on the lower middle space – instead of the middle line in treble above, or the next-to-lowest line in the bass below. This takes me back to my dear teacher’s questionable advice of simply thinking down one step from treble clef to identify pitches in alto clef. In this case at least, the advice is sound.

Drill 2: Key Signature Practice. Write out all the flat and sharp keys several times. Perhaps one staff could fit all the sharp keys, and another all the flat keys. At the very least, you should fill a page of staff paper. All the positions of sharp and flat signs will remain the same in relation to one another; only down one step compared to treble clef (or up compared to bass clef). For extra credit, you could also score a few staves of cancellation signatures using all natural signs.
Now you’ve got the basics down. Your pitch recognition should be well-tested, and your handwriting skilled enough to write out alto clefs and key signatures with ease. This means you’re ready for more challenging drills – transcribing parts from treble and bass staves to the alto staff. Every example below was originally scored in alto clef, for either viola, trombone, or voice. Your job will be to rescore each part back into its original form, using your mental toolkit and your handwriting skills. Attached below are the keys to each drill, for you to check your work against after writing it out.

Drill 3: Treble Clef to Alto Clef. The above excerpts are all taken from the standard repertoire. Transcribe each example into alto clef. Don’t worry about making it all fit into the length of one staff, just write out all the notes as clearly and accurately as you can. Remember the guideposts if you get stuck. Middle C is the middle line of the alto clef. The treble clef symbol curls around the next-to-lowest G line, which is the same pitch as the alto clef’s top line. The lowest pitch of any example is G3, the lowest space inside the alto clef – while the Beethoven’s 9th excerpt reaches all the way up to a high E, the space note above the second ledger line.

Drill 4: Bass Clef to Alto Clef. For these excerpts, think of the guideposts from bass clef to alto clef: Middle C as before; but then the bass clef’s F line between the two dots being the same as the alto clef’s lowest line. Watch out for the way the Beethoven excerpt starts from that same high E in treble clef I pointed out in the previous drill, but then meanders its way down into the bass clef range. As you’ll see, all of these excerpts fit beautifully within the alto clef’s general range. The Debussy excerpt takes the viola all the way down to a bottom C-sharp.
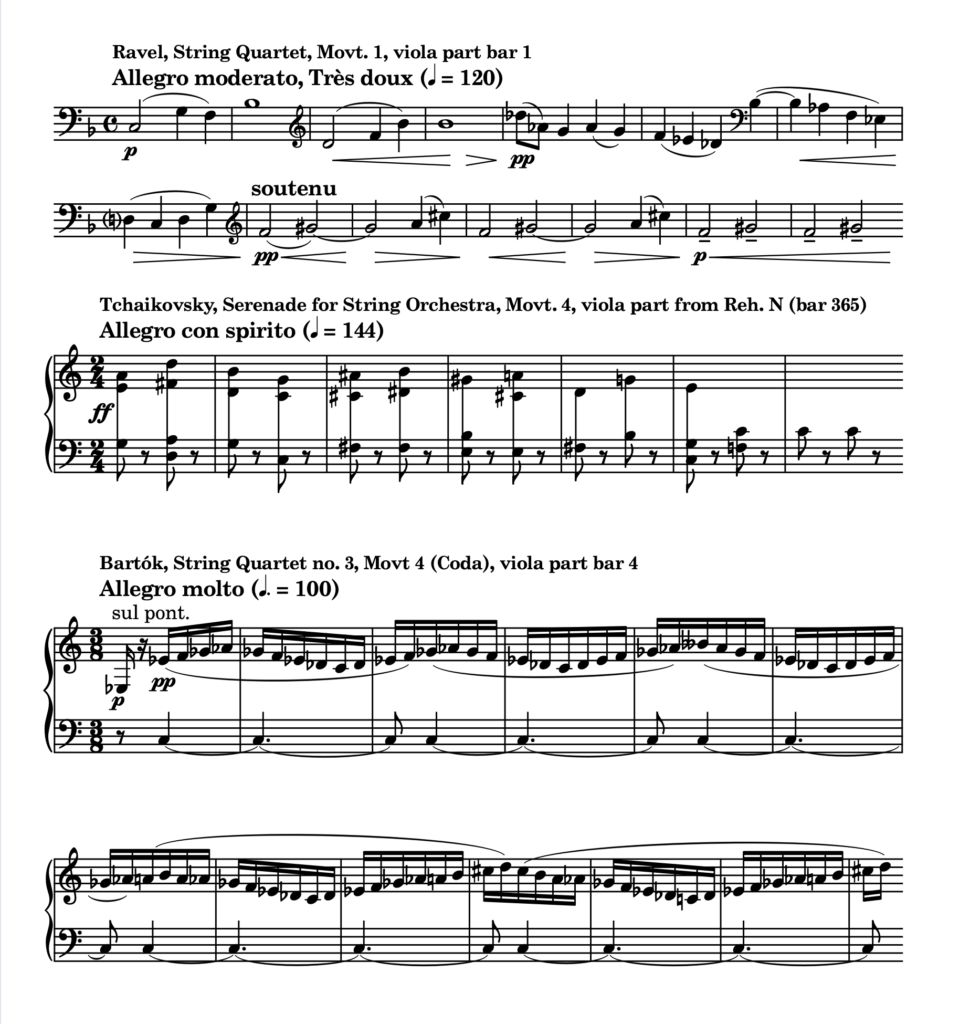

Drill 5: Mixed Clefs/Grand Staff to Alto Clef. Now for a real test: transcribing from mixed clefs and grand staff down to a single alto clef. Just as before, everything will fit nicely within the scope of the alto range, without the need to change clefs or spread across two staves. The double, triple, and quadruple stops in the Tchaikovsky are particularly apt for this range. You’ll need to use two-part writing for the Bartók excerpt, with the first voice flowing up and down over the held low second voice on the C string. The final Ravel excerpt, which I spread across a grand staff, can be reorganised without too much trouble on an alto staff. Just change the stem directions back to pointing in a unified direction, rather than split up and down as I scored above.
Once you’ve finished the above drills, you don’t need to stop there. You might continue to test your skill by writing out your own examples in treble or bass clef, and then transcribing them to alto clef. Or you could raid old songbooks, fakebooks, beginning piano course books (especially those that train students in “Middle C Position” with both thumbs sharing Middle C), and other sources for transcription practice. Just make sure that such material is pretty much within a two-octave range from C3 up to C5 – or a little higher if you’re starting to feel more confident about reading and writing ledger line notes. Of course, the best practice of all is to score directly in alto clef with your own ideas, perhaps composing little sketches or longer unaccompanied works (see MOOOC Term 1, Lesson 5: Unaccompanied Viola Scoring).
Take a massive step up from here in your alto clef training with my next three posts covering Alto Clef Instruments:
PART 3A: SCORE-READING VIOLA
PART 3B: SCORE-READING ALTO TROMBONE
PART 3C: SCORE-READING CONTRALTO VOICE